Before delving straight into the details of Nagios installation and configuration, let's take a brief look at the layout of the network that we're going to monitor. It's a very simple and small network, made up of:
Our network monitoring system is a security-critical host and won't need to directly access the Internet, so it will perfectly fit in the internal LAN.
The OpenBSD installation procedure is documented in full detail in the official FAQ, so we won't cover it here. Nagios doesn't have particular requirements and a standard OpenBSD installation will do just fine: according to the documentation, Nagios makes do with just a machine running Linux (or UNIX variant)
. That doesn't sound so fussy, does it?
Nagios installation only requires adding a few packages:
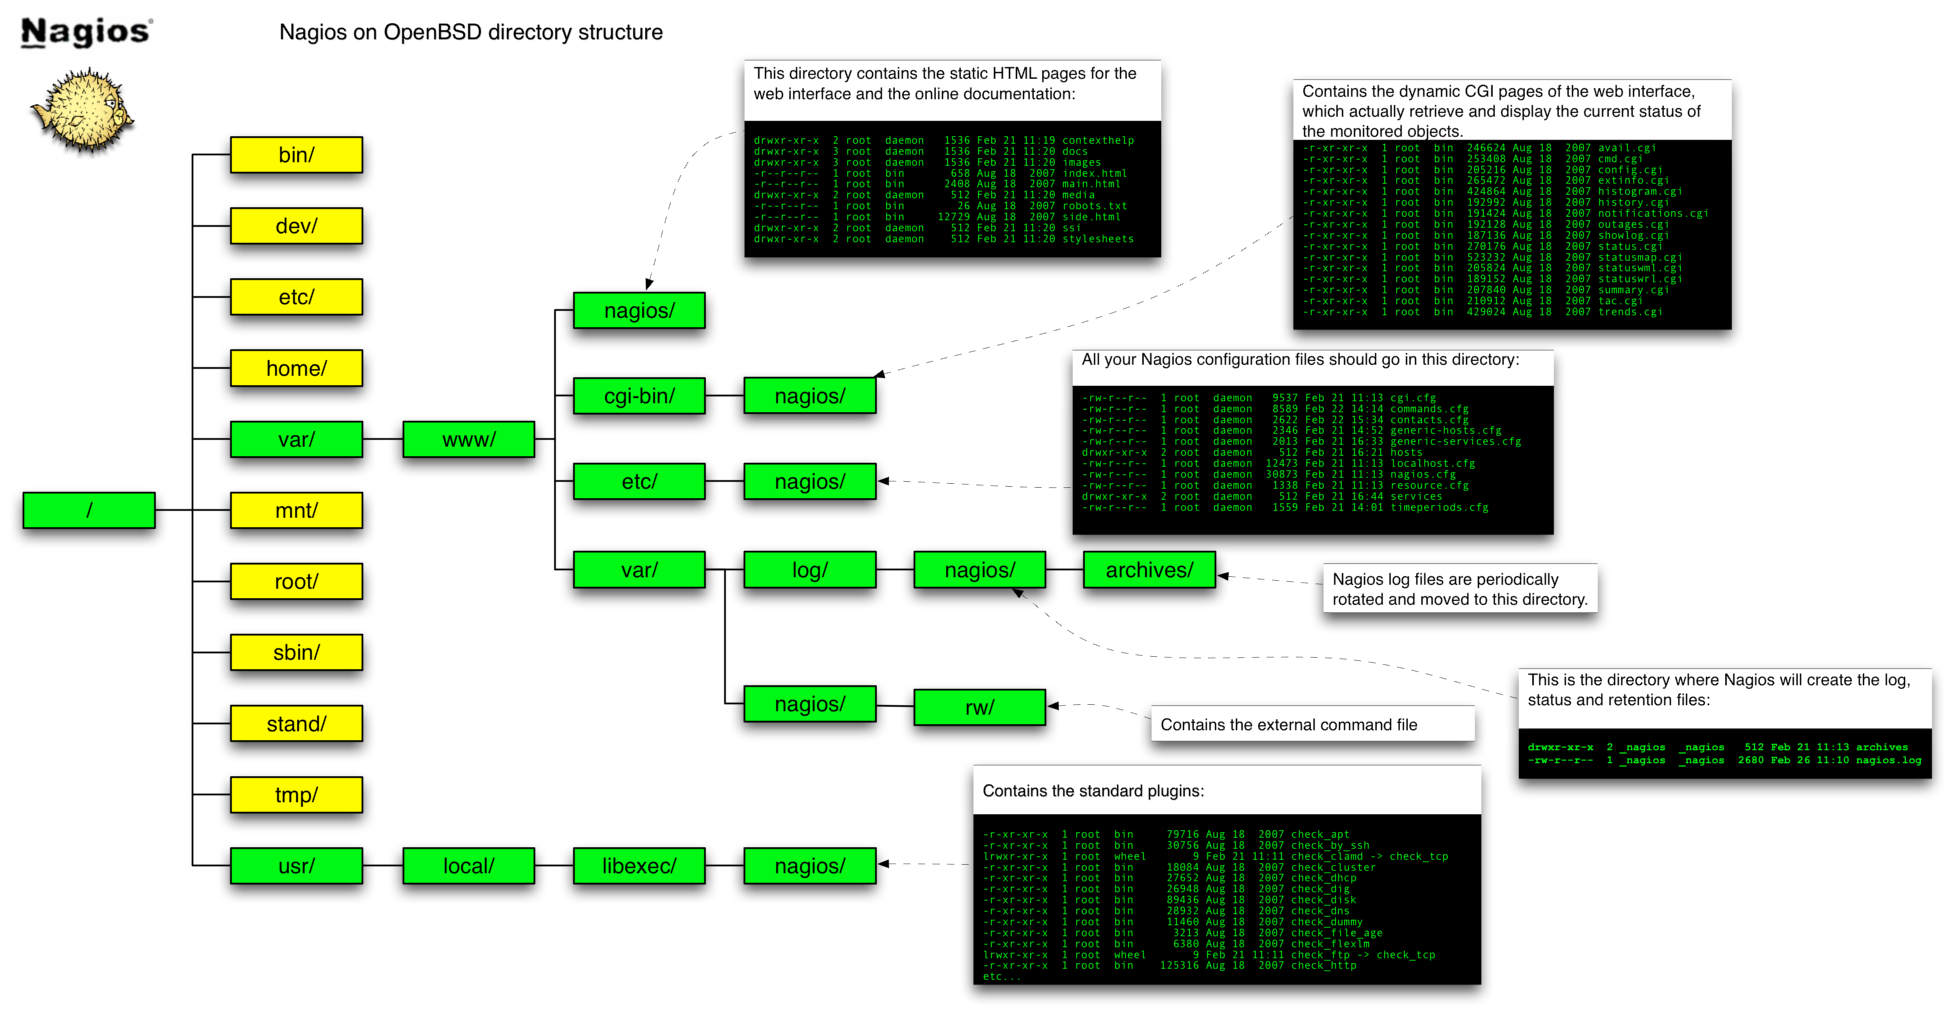
The installation procedure will automatically create the user and group that the monitoring daemon will drop its privileges to (_nagios). The chroot flavor will install Nagios in a way suited for chrooted httpd(8), i.e. with the CGIs statically linked and all the configuration and log files stored inside the /var/www directory. By the way, Nagios has a particular directory structure that you will have to become familiar with:
As a reference, below is a visual representation of the directory structure of Nagios, kindly submitted by Bren Smith (click here for a larger view).
Nagios configuration may look overly complicated at first glance; even the documentation warns that Nagios is quite powerful and flexible, but it can take a lot of work to get it configured just the way you'd like
. Anyway, don't despair! Once you've figured out the underlying logic of its "object-oriented" configuration, you will appreciate Nagios' flexibility and clean design. For the first tests, you can start by tweaking the sample configuration files contained in the /usr/local/share/examples/nagios/ directory, customizing them to your needs.
The syntax of Nagios configuration files follows a few basic rules:
Configuration involves setting several parameters concerning the monitoring daemon, the CGIs and, of course, the hosts and services you want to monitor. All this information is spread across multiple files: we will now examine them one by one.
The overall behaviour of the Nagios daemon is determined by the directives included in the main configuration file, /var/www/etc/nagios/nagios.cfg. Though this file contains several dozens of parameters, for most of them the default value is the most reasonable option and you will probably want to care only about very few of them (usually cfg_file, cfg_dir and admin_email). In any case, you can find a detailed description of each and every parameter in the official documentation.
# Path to main log file and log archive directory. All pathnames are relative
# to the chroot directory '/var/www/'
log_file=/var/log/nagios/nagios.log
log_archive_path=/var/log/nagios/archives

# Paths to files managed internally by the application
object_cache_file=/var/nagios/objects.cache
precached_object_file=/var/nagios/objects.precache
status_file=/var/nagios/status.dat
state_retention_file=/var/nagios/retention.dat
command_file=/var/nagios/rw/nagios.cmd
lock_file=/var/run/nagios/nagios.pid
temp_file=/var/nagios/nagios.tmp
temp_path=/tmp
check_result_path=/var/spool/nagios

# Object definitions (see next chapter) can be split across multiple files.
# You may either list files individually (using the 'cfg_file' parameter) or
# group them into directories (using the 'cfg_dir' parameter). In the latter
# case, Nagios will process all files with a '.cfg' extension found in the
# specified directories and their subdirectories
cfg_file=/etc/nagios/timeperiods.cfg
cfg_file=/etc/nagios/contacts.cfg
cfg_file=/etc/nagios/commands.cfg
cfg_file=/etc/nagios/generic-hosts.cfg
cfg_file=/etc/nagios/generic-services.cfg
cfg_dir=/etc/nagios/hosts
cfg_dir=/etc/nagios/services

# Path to the resource file, containing user-defined macros (see below). You can
# specify more than one resource file using multiple 'resource_file' statements
resource_file=/etc/nagios/resource.cfg

# User and group the Nagios process will run as
nagios_user=_nagios
nagios_group=_nagios

# Email address and pager number for the administrator of the local machine
admin_email=nagios@kernel-panic.it
admin_pager=xxx-xxx-xxxx

# Date format (available options: us, euro, iso8601 or strict-iso8601)
date_format=euro

# Enable checks, notifications and event handlers. Passive checks allow external
# applications to submit check results to Nagios. Event handlers are optional
# commands that are executed whenever a host or service state change occurs
execute_service_checks=1
accept_passive_service_checks=1
execute_host_checks=1
accept_passive_host_checks=1
enable_notifications=1
enable_event_handlers=1

# Checks freshness options. Enabling these options will ensure that passive
# checks are always up-to-date
check_service_freshness=1
service_freshness_check_interval=60
check_host_freshness=0
host_freshness_check_interval=60
additional_freshness_latency=15

# External commands allow the web interface and external applications (such as
# NSCA) to issue commands to Nagios. With a check interval of '-1', Nagios will
# check for external commands as often as possible
check_external_commands=1
command_check_interval=-1
external_command_buffer_slots=4096

# Various logging options
log_rotation_method=d
use_syslog=1
log_notifications=1
log_service_retries=1
log_host_retries=1
log_event_handlers=1
log_initial_states=0
log_external_commands=1
log_passive_checks=1

# Enable retention of state information between program restarts (refer to
# documentation for details)
retain_state_information=1
retention_update_interval=60
use_retained_program_state=1
use_retained_scheduling_info=0
retained_host_attribute_mask=0
retained_service_attribute_mask=0
retained_process_host_attribute_mask=0
retained_process_service_attribute_mask=0
retained_contact_host_attribute_mask=0
retained_contact_service_attribute_mask=0

# State flapping detection options (refer to documentation for details)
enable_flap_detection=0
low_service_flap_threshold=5.0
high_service_flap_threshold=20.0
low_host_flap_threshold=5.0
high_host_flap_threshold=20.0

# Disable automatic updates
check_for_updates=0
bare_update_check=0

# Miscellaneous tuning, performance and security options (refer to
# documentation for details)
interval_length=60
service_inter_check_delay_method=s
max_service_check_spread=30
service_interleave_factor=s
host_inter_check_delay_method=s
max_host_check_spread=30
max_concurrent_checks=0
check_result_reaper_frequency=10
max_check_result_reaper_time=30
max_check_result_file_age=3600
cached_host_check_horizon=15
cached_service_check_horizon=15
enable_predictive_host_dependency_checks=1
enable_predictive_service_dependency_checks=1
soft_state_dependencies=0
auto_reschedule_checks=0
auto_rescheduling_interval=30
auto_rescheduling_window=180
status_update_interval=15
event_broker_options=-1

sleep_time=0.25
service_check_timeout=60
service_check_timeout_state=c
host_check_timeout=30
event_handler_timeout=30
notification_timeout=30
ocsp_timeout=5
perfdata_timeout=5

use_aggressive_host_checking=0
process_performance_data=0
obsess_over_services=0
obsess_over_hosts=0
translate_passive_host_checks=0
passive_host_checks_are_soft=0

check_for_orphaned_services=0
check_for_orphaned_hosts=1

p1_file=/usr/local/bin/p1.pl
enable_embedded_perl=1
use_embedded_perl_implicitly=1

illegal_object_name_chars=`~!$%^&*|'"<>?,()=
illegal_macro_output_chars=`~$&|'"<>
use_regexp_matching=0
use_true_regexp_matching=0
daemon_dumps_core=0
use_large_installation_tweaks=0
enable_environment_macros=1

# Debug options
debug_level=0
debug_verbosity=1
debug_file=/var/nagios/nagios.debug
max_debug_file_size=1000000
The resource file allows you to assign values to the user-definable macros "$USERn$" (where n is a number between 1 and 32 inclusive). Basically, in Nagios, macros are variables (beginning and ending with a dollar sign, "$") that you can insert into command definitions and that will be expanded to the appropriate value immediately prior to the execution of the command. User-defined macros (and the several other macros Nagios makes available) allow you to keep command definitions generic and simple (see the next chapter for some examples).
User-defined macros are normally used to store recurring items in command definitions (like directory paths) and sensitive information (like usernames and passwords). It is recommended that you set restrictive permissions (600) on the resource file(s) in order to keep sensitive information protected.
# Set $USER1$ to be the path to the plugins
$USER1$=/usr/local/libexec/nagios

# MySQL username and password
$USER2$=root
$USER3$=password
The next step is configuring object data, which is probably the trickiest part of the configuration. We will therefore devote the whole next chapter to this topic.